How to add your new @yourdomain.com pop3 email address to Outlook Express and have it download into your existing email box.
This set of directions is to set up a new account on a computer that already has Outlook Express set up to check another email address, AND you want to continue checking that other email address and also check your new email address and download it into the same inbox as your other email.
Click here if you are setting up outlook express for the first time on a computer.
To Set up Outlook Express to check an additional email address and download it into an existing email inbox.
1. First, open Outlook Express by double-clicking the Outlook Express icon on your desktop
2. Your existing mailbox will open.
From the top menu, click on "Tools"
From the submenu click "Accounts"
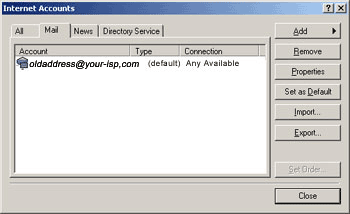
3. A window will open with several tabs near the top.
Click on the "Mail" tab - you should see your current email account listed as default.
Click the "Add" button
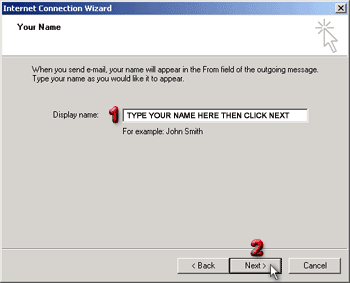
4. Now you will see the "Your Name" screen.
Type in your name
Click "Next" to continue
5. The next screen is the "Email Address" screen.
Type in your entire new yourdomain.com email address
Click "Next" to continue
6. The next screen is the "E-mail Server Names" screen,
Select "POP3" from the drop down list.
Enter mail.yourdomain.com
Enter whatever your ISP uses
Click "Next" to continue
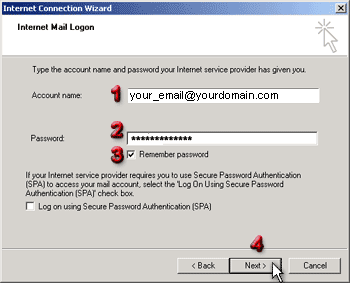
7. The next screen is the "Internet Mail Logon" screen,
Type in your COMPLETE email address in the field titled Account name including the @yourdomain.com portion.
For example, if your e-mail address is
john.doe@yourdomain.com, you would type john.doe@yourdomain.com as your Account name.
In the Password: field, enter in your assigned password.
Check the box next to "Remember password" only if you do not wish to enter your password every time you check your e-mail. (caution - anyone opening Outlook Express on this computer would then be able to access your email account without a password)
Click Next to continue
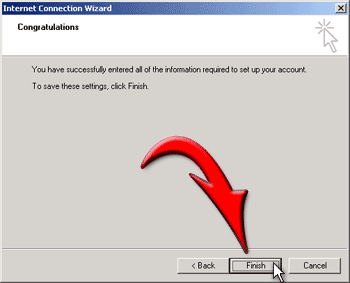
8. The last screen is the "Congratulations" screen. Click "Finish" to begin sending and receiving e-mail